Tuesday 28 July 2015

A day in the life of an EM Surveyor

Over the past few weeks we’ve covered what an EM Survey is, and the different benefits of completing one on your farm. But what I’d like to do today, is give you a bit of an insight into how we at Agri Optics do an EM Survey, ensuring that you receive top notch quality data to help with your ‘precision decisions’. So here we go…

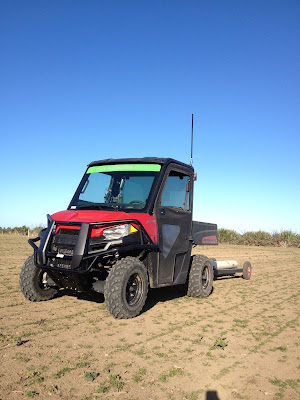
Our surveyor arrives at the farm nice and early. When we get there the gear needs to be all unpacked out of the trailer and set up for the day ahead. Our Polaris needs to warm up and while this is happening the Trimble RTK GPS base station is  set up ready for logging the DualEM data. This base station is highly accurate and gives us horizontal accuracy of +/- 2cm.

Next, we need to plan the survey in conjunction with the farm manager (this often happens before we come on site to do the survey), starting with areas that need to be done first for management reasons, such as working around cows in paddocks etc. Additionally we need to know of any hazards and other features that might influence the survey, such as buried wire guidance, pipes, etc. Once we know all these factors we get on with the job.

To complete the survey we drive the Polaris towing the DualEM around the outside edge of the paddock, once near the fenceline and the second time a few metres in from this. Then we drive up and down at 12 metre intervals along the length of the paddock at approximately 15km per hour. The spacing and consistent speed is important in collecting and processing quality data across the entire survey. We use AB guidance lines on our Trimble FmX to ensure that we drive as straight as possible and reduce overlap which would cost us time and you money. We then complete the survey of the rest of the paddocks in the same way – around the outside and then up and down along the paddock.


(excuse the video, it's a bit shaky sorry!)

As we all know, electronic equipment can be slightly temperamental sometimes and we need to put a few checks in throughout the day to make sure that the DualEM sensor is running as it should. To do this we re-survey transects across previously surveyed areas a few times during the day, making sure that the readings don’t change and ensuring the DualEM is working to its maximum potential.

So, now we’ve completed surveying on all paddocks for the day and have ensured that the data is high quality data by performing these transects and doing a few checks. We then look at the raw (unprocessed) DualEM data out in the field and pick out a few areas that show different EM readings. We go to these points and take soil cores using a corer that is 2.5cm in diameter and 30cm long. We complete a visual observation of the soil, relating these to the EM map. The cores are taken as deep as we can possibly go and then placed carefully on a tube with depth markings on it. With the cores carefully lined up on this marker, we then take notes on parameters such as the depth of topsoil, amount & size of stones, textural properties at different depths and so on. All of these properties help add to the understanding of the final EM map.  


After this the day is almost done. Clean the gear and pack it away safely for next time before the surveyor goes home for the night to look at the EM data collected during that day on their laptop and get a good nights rest ready to do it all again tomorrow.

Blog post written by Jemma Mulvihill from Agri Optics NZ Ltd. To find out more about EM Surveying or any of the topics discussed in this blog call Jemma directly on 021796124 or visit the Agri Optics website.

Tuesday 21 July 2015

How to get the best out of your soil moisture sensors Part 2 (DO)

Following on the theme of what not to do with your soil moisture sensors, below are some gems about the best way we have found to install sensors in the event you need to do it yourself, or need to move a sensor.  Remember most of the sensors that are installed are sampling small volumes and only a few cm from the sensor itself and require “perfect” contact with the soil and must be measuring the crop in question.

DO #1
  • Separate topsoil from subsoil so it can be replaced the same way
  • Put soil on tarpaulin so easier and tidier when put back
  • Measure, install, AND RECORD depths of sensor. In this case 10cm to 30cm (root zone)


DO #2

  • Install sensor vertically, i.e. on its edge
  • Where possible into undisturbed soil. In this occasion we made a slot for the sensor to be pushed into. 


DO #3

  • Mark and RECORD where the sensor is located. Marking can be with tiles as shown or something metal buried at 10cm to be found with a metal detector if necessary.
  • The ground will settle over time, so ensure all soil removed is replaced, even if it appears to be too much.
  • Ensure above ground 'bits' are protected from stock (still to be done here) 

In a subsequent blog we will show that the time taken to install your soil moisture sensor properly will produce quicker and more reliable results. For more information on how Hydroservices can help with your soil moisture sensors you can find more information on our website or you can contact us directly. Cheers, Phil

Thursday 9 July 2015

The Value in Ground Truthing your EM Survey

We’ve talked about water holding capacity (WHC) previously, and following on from Nicole’s blog about visual soil assessments (VSA),  I’m wanting to shed a bit more light on how we go about putting water holding capacity values to your EM soil survey.

An EM survey shows you the differences in the EM value across the site where it is conducted. The values are relative to the rest of the values on the map and are not a specific water holding capacity. To get that you must ground truth the different EM zones and put values to the EM variation.

As a general rule we find that for every EM unit of change in your report, excluding the extremes at each end, the EM unit range is around 7-10mm of WHC difference in the top 700mm of the soil profile. I have to emphasise that this is a general rule and we have seen surveys where 1 mS/m (EM unit) has been worth 30mm of WHC difference over a map and others where the value is a lot less.

To find out the actual variation in WHC for your EM survey, Agri Optics select ground truthing sites and work alongside HydroServices who then go to the site with a neutron probe to ascertain the actual values at the given points. The objectives of this exercise are to:

  1. Confirm the EM mapping reflects the differences in the soil moisture content.
  2. Provide WHC assessments at key locations in key EM zones.
  3. Confirm the EM map can be converted to a WHC zonal map for variable rate irrigation (VRI).
Agri Optics sends an EM map to HydroServices along with the GPS coordinate files so they know where to take the samples.
A shallow EM map with geo-referenced ground truthing sampling points marked.
Agri Optics also gives HydroServices the actual two soil profile depths (cm) and a spreadsheet with the EM values at the point locations.

Point #
Id
Lon
Lat
Zone Value
Shallow EM
Deep EM
1
Orange
175.xxx
-41.xxx
14.37
13.2
40.34
2
Orange
175.xxx
-41.xxx
14.37
12.95
35.73
3
Orange
175.xxx
-41.xxx
14.37
11.44
35.82
4
Yellow
175.xxx
-41.xxx
18.28
17.38
43.73
5
Yellow
175.xxx
-41.xxx
18.28
17.85
46.56
6
Yellow
175.xxx
-41.xxx
18.28
18.2
45.73
7
Green
175.xxx
-41.xxx
21.95
21.84
54.19
8
Green
175.xxx
-41.xxx
21.95
22.66
54.59
9
Green
175.xxx
-41.xxx
21.95
20.31
51.41
10
Blue
175.xxx
-41.xxx
25.81
27.01
62.05

With this data HydroServices then measure the soil moisture, calculate the full point, the stress point and the WHC at each site. This is then compared to the EM values in the different profiles and the correlations drawn up. HydroServices then write a report on their results for the client.

Graph showing the relationship between the soil moisture results and EM data.
From the data HydroServices collects Agri Optics can then generate a WHC map.


Normal EM zone maps can and are used in the majority of situations with great success for VRI, but by ground truthing the zones and generating a WHC zone map, the client is given an extra  level of information and certainty.

Ground truthing sites can also be used for moisture probe placement sites, as these sites have effectively been field calibrated by HydroServices for moisture probes. Agri Optics can provide you with AquaCheck soil moisture probes . I’ll go into more detail on this in a future blog, but more information is available now at www.agrioptics.co.nz/portfolio/aquacheck.

For more information on ground truthing contact Agri Optics or HydroServices.

Blog post written by Chris Smith from Agri Optics NZ Ltd. To find out more about EM mapping or any of the topics discussed in this blog call Chris directly, 021 796876.

Friday 3 July 2015

How to get the best out of your soil moisture sensors... Or Not!

80% of the value of soil moisture sensors are in the installation. If you don’t get this right you will never get any decent data and never be able to field calibrate them with any confidence. Remember most of the sensors that are installed are sampling very small volumes and only a few cm's from the sensor itself and require “perfect” contact with the soil and must be measuring the crop in question.  

If you are looking at installing some sensors this winter, or taking the time to do a maintenance check on those already installed this may be well worth a read. Rather than a dissertation on how to and why, how about a few don’t do this or this!!

Don't #1
  • Don't leave the excess cables on the ground - Isn't this an accident waiting to happen?
  • What about the crack where the sensors are located?
  • And there isn't much growing over the sensors!


Don't #2
  • The sensor needs to be in the soil!
  • And it needs to have crop growing over it!

Don't #3
  • Again, all cables should be protected and not left exposed.
  • Crop would be nice!


So if you have soil moisture sensors installed, take a look at the location and the condition of the site.  If you have any misgivings about the location or condition of the site, get it sorted in the winter because now is the time so they are ready for the spring.

The nuggets of knowledge in today's blog are courtesy of Dr Anthony Davoren from HydroServices Ltd.